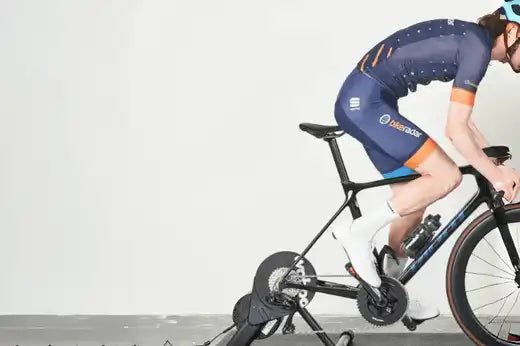
While we all agree that riding outdoors is great, we don’t always have the opportunity to go out and ride, especially during the winter months when it’s not suitable for outdoor cycling. Indoor training lets you pedal and maintain your fitness when you can’t go outside.
Cycling indoors has many benefits: it’s convenient, efficient, weatherproof, and dirt-free. Plus, you can get targeted training to improve endurance, speed, cardiovascular fitness, VO2 max, and more without being interrupted by traffic or bad weather.
If you’re new to indoor cycling, you may be faced with many expensive equipment and accessories. However, building an affordable indoor training set is possible by clarifying your fitness needs and goals.
Generally speaking, the more you spend, the quieter and closer your trainer will be to the outdoor riding experience. Enter the world of smart trainers, and you’ll get precise power measurements, as well as features like cadence sensors and adjustable resistance that can simulate hills or target specific training zones.
Our guide to indoor cycling will walk you through everything you need to know to get started.
Choose your preferred type of trainer.
Indoor trainers fall into three main categories: smart trainers, magnetic resistance trainers, and indoor bikes.
Smart Cycling Trainers

If you’re serious about indoor training, a smart cycling trainer is worth the investment. The best smart cycling trainers automatically increase and decrease resistance to simulate grade changes or provide a tougher, more immersive workout.
This functionality enables indoor cycling apps like Zwift, Rouvy, and MyWhoosh to recreate the elevation gain (and other dynamic cycling elements) of a virtual course or race.
You can shift gears yourself, or use ERG mode, which keeps you at a determined power output level. This is ideal for targeting specific power or heart rate training zones.
Smart cycling trainers come in both wheel-mounted and direct-drive styles.
Direct-drive smart cycling trainers require you to remove the rear wheel of your bike. The trainer will come with a flywheel with a rear dropout pin/thru-axle to mount the bike to the trainer. This means you won’t have any wear on your rear wheel. When you want to go out for a ride, you simply put the wheel back on.
Direct-drive smart cycling trainers are generally quieter and provide a more realistic riding feel when pedaling, but they are generally more expensive than wheel-mounted trainers.
Magnetic resistance trainers

Magnetic resistance trainers are one of the most common types of indoor trainers. They require a bicycle to work, and almost all magnetic resistance trainers are "wheel-on." This means that the bicycle is mounted to the trainer via a pin on the rear axle. The rear wheel then rests on a rubber roller, which spins when you start pedaling.
This roller is connected to a resistance unit. Unlike smart trainers, the resistance it provides is manually controlled by the rider.
Unless you have a power meter on your bike, using a heart rate monitor will be the most affordable way to get data on a standard magnetic resistance trainer.
Wheel-on trainers may wear out grippy race tires, so you may want to consider using harder winter bike tires or buying specialized trainer tires and mounting them on a spare rear wheel. Direct-drive magnetic resistance trainers do exist, but they are rare.
Indoor bikes

If you want to splurge on your indoor cycling equipment, you can buy a high-tech smart bike designed specifically for indoor cycling training.
These are not your average gym bikes. They are usually able to monitor your power output, measure your cadence, and heart rate, automatically control resistance, and more.
They are the most expensive option for indoor training but are arguably the most convenient solution.
Roller Trainers

Another option is roller trainers. They consist of two parabolic, freely rotating cylinders that the bike sits on. When you start pedaling, the cylinders rotate to simulate the movement of the ground under the wheels.
Since nothing is supporting the bike other than the momentum generated by pedaling, they offer a more natural feel.
This is both an advantage and a disadvantage: it helps improve core strength and balance but can be difficult to get started.
If you don't know how to ride on rollers, you should stay close to the handrails you can hold onto to prevent falling on your first few attempts.
Roller trainers are also compact and relatively easy to store, making them a good option if you have limited space at home.
Find the right training space

Once you've chosen your trainer, you need to find a suitable place to put it.
Some people convert their garage or storage room into a dedicated indoor training space to get in hours of indoor cycling. But the average person may not have that much space, especially if you're just starting. You need a place, preferably indoors or at least covered, to set up your bike and trainer, preferably with a small shelf or table in front.
Choose a space where you can keep your trainer for a long time, which will make it more effective to train quickly.
Indoor cycling equipment is quite heavy, and you'll probably sweat a lot, so it's best to choose a floor that's easy to wipe, rather than a carpeted area. Laying down mats to protect the floor is necessary.
If you plan to use rollers instead of a trainer, it helps to set it up near a wall or door frame where you can hold on.
Another thing to consider is noise. Indoor trainers, especially cheaper models, can be very noisy.
If you have elderly or children in your home, find a reasonably quiet place to place the trainer, or find a relatively soundproof room to exercise in.
Get the right indoor training accessories.
Indoor cycling is a hot, hard business, and you’ll probably sweat a lot. Keep a bottle or two of water within easy reach so you can drink while you train.
During a long workout or Zwift race, you may need to refuel. Consider having energy bars, gels, or energy drinks. A fan is a great addition to your indoor cycling setup. It will replicate the wind you’d experience when riding outdoors, and it will prevent you from getting hot.
It’s also wise to put a mat under your bike and trainer (which most trainers come with). This will keep everything stable and in place while protecting the floor. It also helps reduce vibration and noise, especially on wooden floors.
It’s also a good idea to put a towel on the handlebars to catch and wipe off sweat; you don’t want sweat to corrode the screws on the handlebars.
If you decide to follow along with an online workout or use a virtual cycling app, you’ll need to set up a screen or laptop in front of you, so a table or stand may be necessary.
Find the right workout

It can be a great time to train while listening to music, watching a favorite movie, or catching up on a TV show, but you’ll get a more effective and targeted workout if you follow a structured training session. Despite the many benefits of indoor cycling, it can feel like a chore, especially during tough training sessions.
Signing up for platforms like Zwift, MyWhoosh, and Wanlu Competitive can make indoor cycling more fun. These training apps enable you to ride in a virtual world, compete in races, or follow structured workouts and training plans. If you’re not too interested in “gamifying” indoor cycling, other apps, like TrainerRoad, allow you to focus on training rather than gaming.
Take a fitness test, then repeat it.
A baseline fitness test is useful for determining your power or heart rate zones so you know what to aim for when training. You can also use this test as a benchmark to see how you’re progressing.
Many riders use a functional threshold power (FTP) test to gauge their fitness level. An FTP test on Zwift takes about 15 to 20 minutes to complete. Critical power is another useful measure of your fitness level, and it can be a more complete reflection of your physiological capabilities than FTP.
Decide on the frequency and intensity of your training

To plan your training, consider the timing and regularity of your sessions. The time of day you exercise depends largely on your lifestyle and preferences. Some people find that they work out better in the morning, while others work out better in the evening. If you have a busy life, you may need to squeeze in time for training when you can.
A general benchmark is three 30- to 40-minute focused sessions per week, with some longer outdoor rides on weekends or weekdays as a break.
Most importantly, pace yourself, especially if you're just starting. Don't burn yourself out -- indoor cycling can still lead to overtraining.
It's best to start at a sustainable level and maintain it, then increase the duration or frequency of your training when you feel you can handle more.
Tag:#Indoor Cycling Guide #Cycling Beginner's Guide #Beginner's Guide #Cycling Guide #Indoor Training #Cycling Training #Training Equipment #Training Accessories #Cycling Equipment #Cycling Accessories #Cycling Platform #Smart Cycling Platform #Magnetic Resistance Cycling Platform #Indoor Bike #Roller Cycling Platform #Exercise Frequency #Exercise Time


Laisser un commentaire
Tous les commentaires sont modérés avant d'être publiés.
Ce site est protégé par hCaptcha, et la Politique de confidentialité et les Conditions de service de hCaptcha s’appliquent.